Integrating with the ezCater Public API

Welcome to the ezCater API!

ezCater has built systems to support integration between your brand’s ezCater orders and other platforms, such as Point of Sale platforms or reporting systems, including a webhook event system and a publicly consumable API to retrieve Menu and Order data.

The sections of this guide provide an overview of the processes involved in setting up the Public API’s functionality. It also provides examples of some of the ways you can use these tools to pull information from ezManage and into your POS. In a general sense, you’ll need to:

  1. Generate a one-time authentication token for that user
  2. Use that token to connect to the API
  3. Create a subscriber with GraphQL
  4. Use that subscriber to set up any desired subscriptions

What kinds of tasks can the Public API be used for?

The Public API utilizes webhooks to allow you to pull information on order events and store menus into a Point of Sale or other integrated platforms. The exchange of information is one-directional; the API is not built to accommodate any injection of information back into ezManage. By integrating with the API, you’re able to populate order information for injection into a store’s POS, with no manual entry required.

How does this integration affect order acceptance?

The short answer is: it doesn’t!

Since the Public API is not designed to pass information or updates back into ezManage, it isn’t used to accept orders. Caterer workflow for order acceptance will continue the same way that you’re used to. It’s also important to keep in mind that the subscriptions we’ll detail further down in the document send a webhook when an order is accepted – not when it’s placed. Integration with the API has no effect on the current setup of order notifications; caterers still get the phone calls, emails, and/or text messages alerting them to new ezCater orders just like they’re used to.

Open API Workflow

API workflow
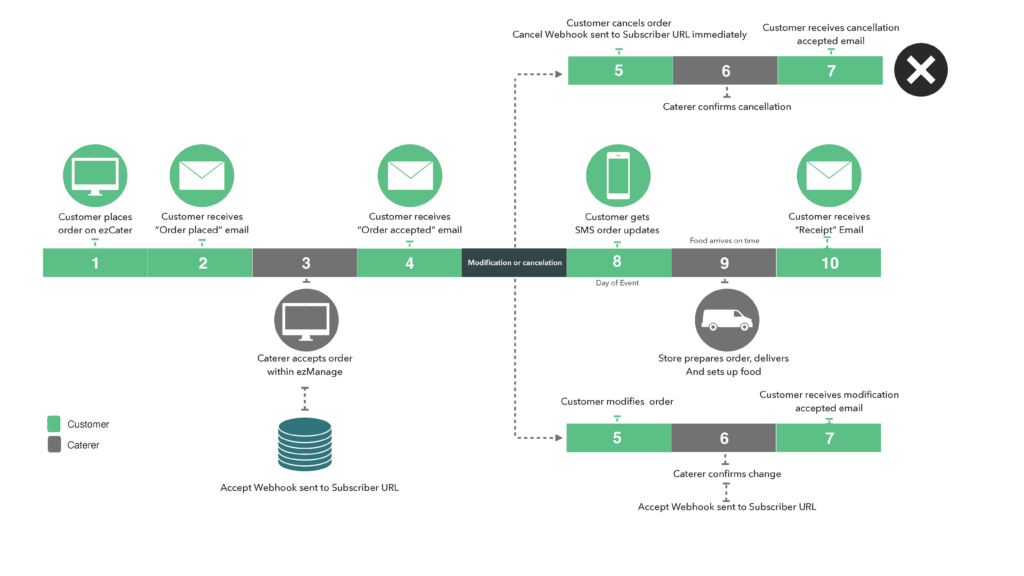
  1. Customer places order on ezCater Marketplace
  2. Customer receives ‘Order Placed’ notification
  3. Caterer receives ‘Order Placed’ notification & accepts order
    • Caterer accepts order within ezManage
    • ‘Accepted’ webhook notification sent to all Subscribed webhook URLs
      • Integrating Platform (vendor or brand) makes API Request Query using the order entity ID received within webhook payload
  4. Customer receives ‘Order Accepted’ notification
  5. Optional: Customer initiates Modification or Cancellation
    • Customer modifies order
      • Customer may request modification online until Store’s Lead Time Cutoff time
      • ezCater Customer Service may execute modification at any time, including after order fulfillment, with approval from Store if under Lead Time Cutoff
      • Customer receives Modification Accepted notification after Caterer Accept
    • Customer cancels order
      • Customer may request cancellation up to 24 hours of order fulfillment
      • ezCater Customer Service may cancel order at any time, with approval from Caterer if under 24 hours
  6. Optional: Caterer confirms Modification or Cancellation
    • Cater confirms modification
      • Modifications require additional Caterer Accept action
        • Once completed a new ‘Accepted’ webhook notification will be sent out, there is no ‘Updated’ notification
        • Integrating Partner/Brand is expected to check if ‘Accepted’ webhook is for new or existing order and handle accordingly
        • Caterer Accept may be completed either ezCater Customer Service with authorization from Store
    • Caterer confirms cancellation
      • ‘Canceled’ webhook notification sent out
  7. Optional: Customer receives notification of confirmation of Modification or Cancellation
  8. Customer gets ‘Day of Confirmation’ text
  9. Food arrives right on time
    • Store prepares food
    • Store may use ezDispatch or their own drivers for delivery/setup
  10. Customer receives ‘receipt’ email

Special call-outs

  • Goal is for financial/inventory reconciliation and reducing manual entry, rather than fulfillment
  • API users/tokens strategies will be discussed throughout implementation process
  • Order Query will advise whether Third Party Delivery (ezDispatch) is active on order, which means ezCater will not pay restaurant for either tip/gratuity or delivery fee, even if those values are present in the Order Query Response
  • Best practice is for the Integrating Partner/brand to do a new Order Query prior to pushing to POS to ensure that POS has most current version of order
  • Menu synchronization is not part of API, however we will work together to develop custom process for ezCater to ingest your menus, either via scheduled pulls or webhook notifications when updates are made
    • Those updates will be made manually by ezCater’s Menus Team after they have been received/processed
  • No bulk updates to Store configuration through API endpoints

How to Get your API Token

Once you’ve completed the user access form, you’ll be notified when your user profile and permissions have been configured by our team, so your technical specialist can acquire the authorization token.

  1. Sign into the API User account that was created.
  2. Go to Integrations within the Settings tab of ezManage.
  3. Click “Generate” to receive your unique authorization token.

Make sure to save this token! The token can only be granted once, and if lost cannot be recovered. This token will be used as you set up the integration on our Public API.

Using GraphQL

Heads up! The remainder of this guide assumes that your team is familiar with the use of API Clients, and are able to set up a connection via a client of your choice. All requests must be made to our public GraphQL endpoint at https://api.ezcater.com/graphql via HTTP POST with an ‘Authorization’ header using the generated token as its value.

If you have never used GraphQL before, there is a lot of good information and examples to be found at https://graphql.org/learn

GraphQL leverages a pattern called introspection, which allows you to query the endpoint for information about the schema and structures you can request. Tools like GraphQL will handle this automatically, providing an easy-to-navigate documentation that you can use to see what queries are available, what fields you can ask for and what the return values will look like.

Building a Request

Make a POST request with your Query body to https:/api.ezcater.com/graphql, using the following headers:

  • Content-Type: application/json
  • Authorization: <Your API Token>
  • Apollographql-client-name: <Your Organization Name/Identifier>
  • Apollographql-client-version: <Your Software Version>

In order for ezCater to properly track and troubleshoot requests to our API, all requests must be named. A collection of our naming convenstions for each query can be found at the bottom of this document.

Template:

query <NAMEOFQUERY> {
menus {
Nodes {
Id
Name
startDate
endDate
}
}
}

Example:

query menusByCaterer {
menus {
nodes {
id
name
startDate
endDate
}
}
}

As an additional example, you can query __schema to list all types defined in the schema and get details about each:

query fullschema {
__schema {
types {
name
kind
description
fields {
name
}
}
}
}

Or query __type to get details about any type:

query {
__type(name: "Menu" ) {
name
kind
description
fields {
name
}
}
}

Once you have your API Token and have connected to our endpoint via an API Client, you can begin setting up your integration with the Public API.

Set Up your Integration: Creating a Subscriber

A Subscriber represents the integration itself. The Subscriber will manage where event notifications are sent to as well as what events you want to subscribe to. NOTE: The webhookURL is the location you want the event notifications to be sent to.

Create Subscriber Mutation

To create the Subscriber, simply make a createSubscriber mutation request to the GraphQL endpoint.

Example Mutation:

mutation {
createSubscriber(subscriberParams: {
name: "Sample Integration",
webhookUrl: "http://your-webhook-url.com/your-desired-endpoint"
}) {
subscriber {
id
name
webhookUrl
webhookSecret
}
}
}


Make sure you include the webhookSecret (line 10) in the values you want to return, and save it! The webhookSecret can only be seen on Subscriber creation, you will not be able to query for it afterwards.

The response will look something like this:

{
"data": {
"createSubscriber": {
"subscriber": {
"id": "0fc73833-fac0-4a4b-be38-b0a9baea4507",
"name": "Sample Integration",
"webhookUrl": "http://your-webhook-url.com/your-desired-endpoint",
"webhookSecret": "A9e8018dac74463c632dea294494ca468f470c4df8513309d0e7ef8e265e08f7"
}
}
}
}


NOTE: We currently only support creating one subscriber per API user. If you receive an error indicating that your subscriber could not be created, it may be that one has already been set up. Try running the subscribers query to see if any already exist.

TIP: You will also need the Subscriber ID in subsequent steps, so we recommend keeping track of it now.

Set Up your Integration: Create your Subscriptions

Subscriptions are how the Subscriber determines what events it needs to send out notifications for. Once you’ve created your subscriber, you can customize the sorts of information that you may want to pull into your POS systems.

NOTE: We currently only support Order Accepted, Order Cancelled and Menu Updated subscriptions.

Caterers Query

To create your subscriptions you will need to know the UUID of the locations for which you want notifications to be sent across the integration. These UUIDs can be retrieved by making a caterers query to the endpoint.

Example query:

query allCaterers {
caterers {
uuid
name
storeNumber
address {
street
street2
city
state
zip
}
}
}

It may be useful to include the address information so that you can identify which UUID corresponds to which location.

Create a Subscription Mutation

Now that you have your location UUID you can begin to create your subscriptions using the createSubscription mutation. For each location, you will need to send two mutations (one for accepted events and one for cancelled events). As the integration functionality expands, there may be additional subscription options as well!

As previously mentioned, the order accepted subscription triggers once an order has been accepted, not when the order is placed. It also triggers when an order has been updated and that update is accepted.

We recommend exploring the schema so that you can determine which available values are going to be useful for meeting your needs. You can find examples of how these subscriptions might look, in the next section.

NOTE: If you need your subscriberId you can run the subscribers query:

query allSubscribers {
subscribers {
id
}
}

Once your subscriptions are set up, you should now receive Event Notifications at the webhookUrl that was specified during Subscriber creation.

NOTE: If you need to change the webhookUrl, you can use the updateSubscriber mutation to change the webhookUrl and/or name of your Subscriber.

Example Mutations

Create an order accepted subscription:

mutation createsubscription {
createSubscription (subscriptionParams: {
subscriberId: "your-subscriber-id",
eventKey: accepted,
eventEntity: Order,
parentEntity: Caterer,
parentId: "your-caterer-id"
}) {
subscription {
parentEntity
parentId
eventKey
eventEntity
}
}
}

Create an order cancelled subscription:

mutation createSubscription {
createSubscription (subscriptionParams: {
subscriberId: "your-subscriber-id",
eventKey: cancelled,
eventEntity: Order,
parentEntity: Caterer,
parentId: "your-caterer-id"
}) {
subscription {
parentEntity
parentId
eventKey
eventEntity
}
}
}

Create a menu updated subscription:

mutation createSubscription {
createSubscription(subscriptionParams: {
subscriberId: "your-subscriber-id",
eventKey: updated,
eventEntity: Menu,
parentEntity: Caterer,
parentId: "your-caterer-id"
}) {
subscription {
parentEntity
parentId
eventKey
eventEntity
}
}
}

Adding External IDs

ezCater’s API Support team will add your menu’s External IDs/PLUs to the ezCater menu for use in querying. The team will export your menu; you will fill in the PLUs for your menu items; and the team will import the information back into the ezCater menu. To initiate this process, contact api_support@ezcater.com

Optional Setup: Validating the Webhook

You have the option to validate whether the webhook you received actually came from ezCater.

The X-Ezcater-Signature header value consists of a timestamp and the signature, separated by a period. You can use the timestamp from this header, your webhookSecret value (from when you initially created the subscription), and the request body to verify this signature.

STEP 1: Create a computed signature payload from the webhook request data

You need two pieces of information for this step:

  • The timestamp from the X-Ezcater-Signature header, which is the first portion before the period
  • The request body

Concatenate these two values using a period to obtain a computed signature payload. For example, in Ruby this would look something like:

timestamp = x_ezcater_signature_header.split(“.”) [0]
computed_signature_payload = [timestamp.to_i, request.body].join(".")

STEP 2: Compute an HMAC signature of the request data

You need two pieces of information for this step:

  • The computed signature payload from Step 1
  • The webhook secret provided to you when you created your subscription

Compute an HMAC signature using your webhook secret and the computed signature payload. For example, in Ruby this would like something like:

signature = OpenSSL::HMAC.hexdigest("sha256", webhook_secret, computed_signature_payload)

STEP 3: Compare the provided signature with the computed one

You need two pieces of information for this step:

  • The computed HMAC signature from Step 2
  • The provided signature from the webhook request

Compare the computed HMAC signature with the value after the period in the X-Ezcater-Signature header. If these two values match, the request is valid. If they do not match, the request may have been tampered with or originated from an unauthorized source.

Querying the Public API

We recommend using a tool like GraphQL for viewing all the fields that can be queried from the Public API. This section will give a brief overview of our top-level queries.

Caterers Query

The Caterers query returns basic information about all of the catering locations that have been tied to the integration. This query is typically used to find Caterer UUIDs for creating Subscriptions and querying for a specific Menu.

Example query:

query allCaterers {
caterers {
uuid
name
storeNumber
address {
street
street2
city
state
zip
}
}
}

It may be useful to include the address information so that you can know which UUID corresponds to which location.

Order Query

When you receive an Event Notification, the payload will include the UUID of the Order that has changed.

You can use this UUID to query the Public API to see more details about the Order. Note that you must have permission within ezManage to access the store associated with an order UUID to be able to pull information about it.

Example query:

query orderById {
order(id: "UUID") {
orderNumber
orderSourceType
isTaxExempt event {
headcount timestamp
catererHandoffFoodTime
orderType
thirdPartyDeliveryPartner
}
caterer {
uuid
live
name
address {
street
city
state
}
}
totals {
customerTotalDue {
currency
subunits
}
salesTax {
currency
subunits
}
salesTaxRemittance {
currency
subunits
}
subTotal {
currency
subunits
}
tip {
currency
subunits
}
}
catererCart {
totals {
catererTotalDue
}
feesAndDiscounts (type: DELIVERY_FEE) {
__typename
name
cost {
currency
subunits
}
}
orderItems {
name
uuid
totalInSubunits {
subunits
currency
}
menuId
posItemId
menuItemSizeId
quantity
noteToCaterer
specialInstructions
customizations{
customizationId
posCustomizationId
name
quantity
customizationTypeName
}
}
}
}
}

Subscriber Query

The Subscriber query returns information about the Subscribers and Subscriptions for the integration. This query can be useful in determining if you have successfully created a Subscriber or Subscription. At this time we only allow one Subscriber per API user.

Example query:

query allSubscribers {
subscribers {
id
name
webhookUrl
subscriptions {
parentId
parentEntity
eventEntity
eventKey
}
}
}

Event Notifications

Once you have set up your integration, you will begin to receive Event Notifications for any Subscriptions you have set up. Notifications will be sent to the webhookUrl specified during Subscriber creation. The notifications will provide basic information about the event that occurred, but for detailed information, you can query the Public API.

Example notification payload:

{
“id”: “[uuid of the notification]”,
“parent_type”: “Caterer”,
“parent_id”: “[uuid of the caterer]”,
“entity_type”: “Order”,
“entity_id”: “[uuid of the order]”,
“key”: [“accepted”,]OR[“cancelled”,]
“occurred_at”: “[time]”
}

{
“id”: “[uuid of the notification]”,
“parent_type”: “Caterer”,
“parent_id”: “[uuid of the caterer]”,
“entity_type”: “Order”,
“entity_id”: “[uuid of the order]”,
“key”: [“accepted”,]OR[“cancelled”,]
“occurred_at”: “[time]”
}

NOTE: At this time we are only supporting Order Accepted and Order Cancelled notifications. We will communicate changes as more notification types are added.

Data Dictionary

Mutations

Function: Subscriptions available for use

Description: Subscription mutations available for use

QueryDescription
Order AcceptedNotifies subscribers when an order has been accepted
Order CancelledNotifies subscribers when an order has been cancelled
Menu UpdatedNotifies subscribers when a menu has been updated

Queries

Function: Queries

Description: Queries available to call

QueryDescription
caterersInformation about all locations tied to this integration
menuDetailed menu information for this location
menusDetails for this specific order
orderDetails for this specific order
subscriberInformation about all subscribers and subscriptions for this integration